http://www.quiltville.com
Trip Around The World
~Helping Katrina~


Quilt Size approx 72"X85"
In
the aftermath of Hurricane Katrina, so many of us are digging
in our hands and sharing our hearts by making quilts for the displaced
survivors who have lost their homes, their family, their friends, their
everything. I belong to several email lists who are encouraging each
other to reach out and share love and hope. Many quilts have been
called for, and we are answering that call! I recieved an email
from a
quilter who stumbled upon the "Streak of Sunshine"
child's charity
quilt that is on this site. She wrote that the Red Cross is asking for
twin sized quilts and could she just make four of the streak of
sunshine quilts and then put them together for a trip around the world?
I did some math figuring and realised that the quilt would be way
bigger than the needs, the quilt dimensions just didn't come out right
for her to quadruple that quilt, but the idea was there.
I
played with the math a bit, and found that if I made the strips a bit
narrower in the panels, and made the panels with 9 strips instead of
8, that the quilt worked up just right with only having to make 4
panels....and there was almost no waste! What little bit there was I
trimmed and inserted in the backing. I'll get to that pic later when I
actually post a pic of the finished quilt. I also wanted to be sure, in
an effort to not duplicate someone else's instructions, that there was
not already a strip pieced trip around the world quilt pattern out
there on the net somewhere as it is. I know there are patterns in
BOOKS.....they've been around for ages, but what about directions on
the net? How funny to find when I put "trip
around the world pattern" in the search engine that I came up with
links to my own "Scrappy Trips" pattern and references other people had
made to the same! I found ONE pattern that had you cut actual
individual squares and stack them in piles to piece the trip around the
world pattern (ACCCKKK!!)
But NO trip around the world directions from strips to be found on the
net. So now
there is!
The directions are for TWIN SIZE only, and I don't anticipate posting other sizes on this page.
Cutting:
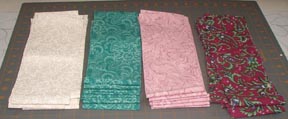

This quilt will work with either 5 fabrics for the center:
(8) 4"
wide strips each of four different fabrics shown to the left ,cut
selvege to selvege.
(4) 4" strips of the 5th fabric shown on the right,cut selvege to selvege
The 5th fabric you only need 4 strips...4X4 = 16" or approx 1/2 yard.
You will need about 1/2 yard to do the 2" inner border and 1 1/4 yrds to do the outer border.
Nine fabric version:
1/2 yard of 9 different fabrics for quilt center, 1/2 yard for inner border. 1 1/4 yards for outer border.
(4) 4" strips of the 5th fabric shown on the right,cut selvege to selvege
Yardage conversion for
those who need to know!
8 X 4 =32"
I'd buy 1 yard each of the first 4 fabrics. (Some leftovers for the
scraps
is ALWAYS good!)Five fabric version:
The 5th fabric you only need 4 strips...4X4 = 16" or approx 1/2 yard.
You will need about 1/2 yard to do the 2" inner border and 1 1/4 yrds to do the outer border.
Nine fabric version:
1/2 yard of 9 different fabrics for quilt center, 1/2 yard for inner border. 1 1/4 yards for outer border.
OR:
(4) 4" strips each of 9 different fabrics. I was
shooting for a
center that measured about 60X70 and this is how the math broke down.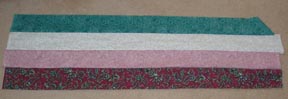

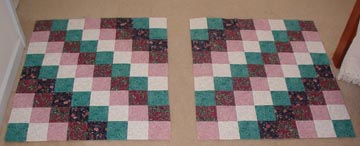
I know the color looks
off between these two photos, but the sun
started to come through the window where I was laying them out!
Arrange your 4 strips in a manner you find pleasing. Stitch 8 identical
panels this way. I save the pressing until after the next step.
If you look at the second picture, you will see I have inserted the 9th
strip between two identical panels. You want to be sure the panels read
in the same order left to right.... and that you don't have the same
strip on the far left as on the far right.
If you are using the 9
different strips for your panels, just sew all 9 strips in an order
that is pleasing to you. All four panels must be
identical to each other whether you are using the 5 fabric version or
the 9 fabric version.

Here I am pressing the
seams. Every
other
strip will have the
seams pressed towards the inside on both sides of the strip, the other
strips will have the seams pressed away from them. This is crucial for
the next sewing step, so the seams will butt up against each other
instead of going in the same direction. I did find that using 9 strips
in the panel (an odd number) does make you have to flip ONE seam when
sewing sub cuts together, but....oh well...
After pressing, take and fold your
panels in half by bringing the two edge
strips right sides together. Stitch down this side turning the panels
into "tubes".


Take your panel-tubes to the
cutting mat. Fold the tube carefully as
shown, and trim one end. Cut the tube into 4" sub cuts. You should get
10 sub cuts per panel. For right now keep them in 4 piles of 8 units,
and
set the extras aside. They will be used later.
Take one of your pieced units...it
will be all connected into a circle-loop.
With your seam ripper, simply slip through about every 3rd stitch, and
open up the circle into one length of pieced squares. Our first two
pieced panels are going to be identical to each other, and they are
both
going to stair step DOWN. Take a second circle-loop, and to be sure you
are
opening it in the right place, arrange it so that you can tell it would
lay identical to the one before it. When you find that the placement
matches, stair step the top square down one, and open the loop between
the new top square and what is now the bottom square. What was once the
top of the first unit, is now the bottom of the second!


Stitch these two units together in
a 1/4" seam. Press towards the
second strip. Take another loop and lay it out next to the second
strip, finding where it matches identically, and then stair step it
"down" one. Repeat with all 8 units until you have one panel. Repeat
for the second panel...these two panels are IDENTICAL to each other.

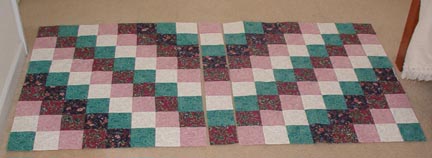
Here is one panel looking really good, coming together!
And the two identical "down hill" panels.
Now you are going to repeat the
process for the "up hill" panels, but
first before we start, we need to know that they are exactly "mirror
image" of the "down hill" panels.

To get my "up hill" panels started,
I laid out one of the down hill
panels on the floor, left a space (the final strips will go here in
between the panels) and then opened one of the loops EXACTLY as the
last strip I added to the down hill panels. See how it is exactly the
same?
Then...because I am going to be stair stepping UP...I took one of the
pieced loops...laid it against the first strip I had just
opened...found where it matched exactly...and then stair stepped UP one
to find where I needed to unpick the seam. Once I had these two right,
I knew I could continue for the rest of the up hill panel with no
problems, and then finish the SECOND up hill panel identical to the
first.
My two identical up hill panels!
Now the magic starts!
I want you to think of this quilt
as two IDENTICAL HALVES. Bottom half,
and top half. If we make two identical bottom halves, and flip one over
to be on the top, it will perfectly mirror image the bottom. So let's
make the bottom half!
One down hill panel, and one up
hill panel with a space in between.
Remember those extra cuts we set aside? this is where they come in!
Take a loop, lay it in between the
panels, aligning it with the last
strip on the down hill panel. Find where it is exactly the same as the
down hill panel. You are also going to stair step this one DOWN. Open
the strip where you need to. You can see the diamond pattern now!
Stitch the center strip to the downhill panel and press towards the
strip. Then stitch the up hill panel to the other side. Press.
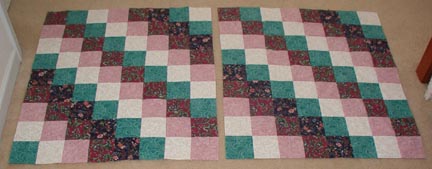
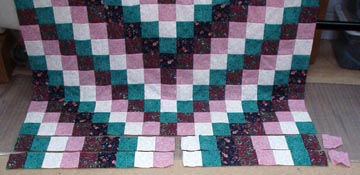
Repeat this so you have TWO quilt halves, just like this....identical!

Here are the two halves mirror imaging each other. I don't have the center strip sewn into the top half yet,
I was too eager to see how it was going to look so I laid it out first!

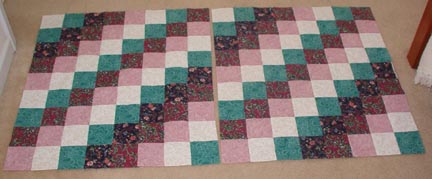
Here we go! Looking great! Now, you
are going to take TWO of the
left over pieced strips...working from left to right, find where this
strip needs to open up. This one will take you all the way to the
center square. Open it up and lay it there. Take the second strip. This
one is going to go in reverse order....mirror imaging the first trip
you laid out. Or, if you find it easier, you can follow the pattern to
the outside edge of the quilt to open it too. It is going to be one
square longer than you need it to be, so you will remove one square at
the very end. Stitch these two opened loops into one length. Stitch
them between the quilt halves. Press the top well! YOU DID IT!!
I got to this point and still had 4
circle-loop-strips left! The quilt center was
only 66" long at this point, so I thought I could open the loops, and
add one more row to the top and the bottom. In the picture above you
can see how I opened the strips, stair-stepping them the way they
needed
just as I did the center strip that joined the halves. On the far right
of the pic you can see the extra squares that I removed. Stitch the
strip halves together, and add one to the top of the quilt, and one to
the bottom!
The top now measures about 59.5" X 73".
I added a 2" cut inner border and a 5" cut outer border making the quilt top finish at 72"X85"
You may ask now...well, couldn't I just have made the panels with 10 strips instead of 9 to get the same thing? Yes...you could have....but then you would have had MORE loops left over.(about 6 of them!) What would you do with those? I admit that I am deeply drawn to yardage conservation, and this left me with only the tail ends of the panels...they were too narrow to cut to 4"...so I trimmed them 3.5" and stitched them into one long length and inserted it into the backing! This made the backing just long enough for pinning into the quilting machine, leaving room for the side clamps. Makes the back interesting too!

My next goal is to make one using NINE different fabrics!
I hope this encourages you to make a Trip Around the World quilt if you haven't in the past, and make one to donate too :c)
I'd be happy to display your pics here if you use this pattern!
 Questions
or Comments? I would love to hear from you!! Bonnie@Quiltville.com
Questions
or Comments? I would love to hear from you!! Bonnie@Quiltville.com© Quiltville Custom Quilting.All Rights Reserved. No part may be used, copied or otherwise
altered without express written permission from the webmaster.