http://quiltville.com
Stitch
a
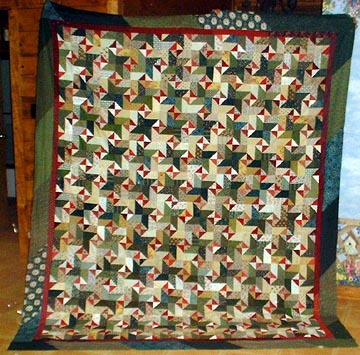
"Star-Struck"
Quilt!

This quilt is
Sew Fun
and Sew
Easy
to whip up in co-ordinated fabrics, or in scraps!
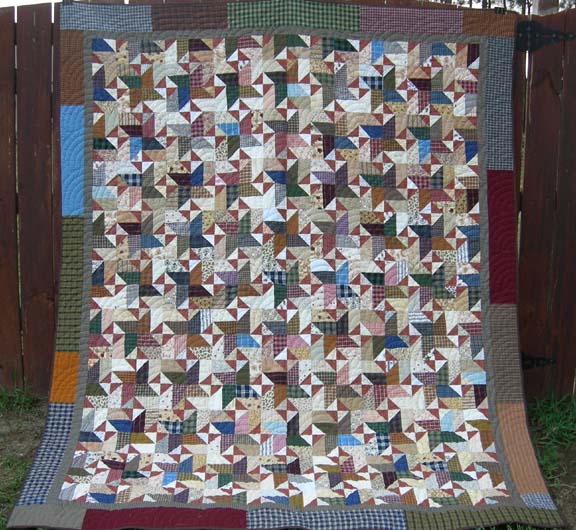
This
plaid version was made using a variety of homespuns and fabric obtained
from thrift-shop shirt purchases! 80 blocks set 8X10 give this quilt a
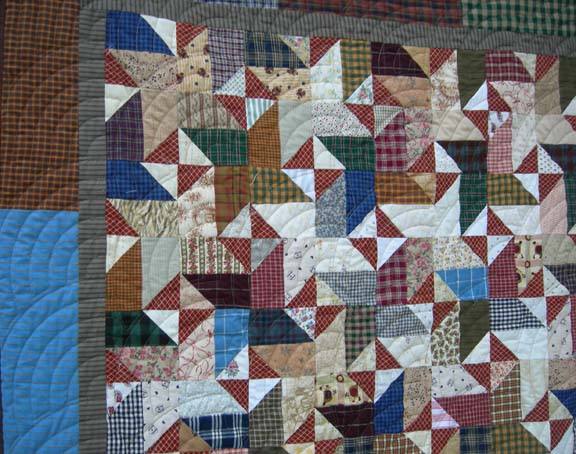
center measuring 64"X 80" before borders! Click here for close up of
continuous baptist fan quilting
detail!

I stitched this quilt
top in a weekend retreat with my Sulphur Springs Sit n Sew group at the
Stitchin' Heaven Bunkhouse in Quitman TX!
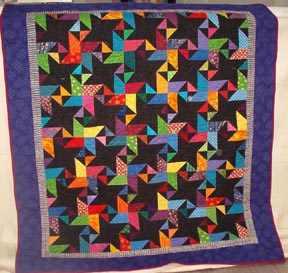
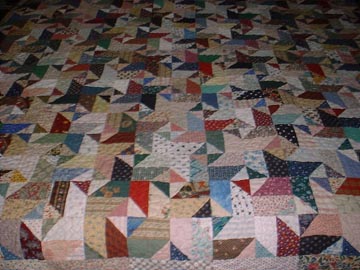
Here
is a glimpse of this quilt done in totally random scrappy colors!
Click Here
for close up detail.
(Sept, 2005: This quilt donated to
Hurricane Katrina Relief Efforts.)
Since
this is a scrap
quilt,
no
exact yardage is given. But I will tell you how *I* constructed this
quilt,
and you can adjust it to your own needs. This quilt has 99 8" blocks
set
9X11! Quilt is 72X98 before borders. For a quick baby quilt, try
setting
25 blocks 5X5 for a quilt that measures 40" square before borders.
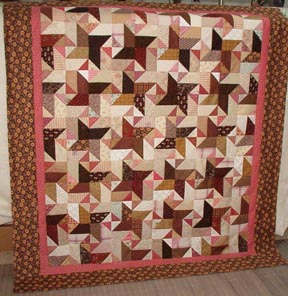
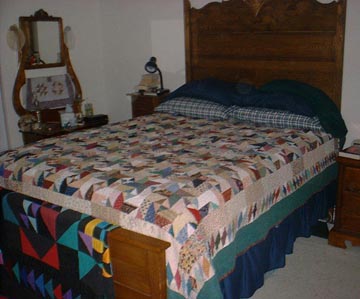
For a LAP size
(shown)...try
doing 30
blocks
set 5X6!
From
various light and
dark
scraps
cut strips 2 1/2" wide. The minimum size is 2 1/2" X 4 1/2". Also..cut
a
bunch of 2 1/2" squares from your light fabrics (396 for the big quilt,
or 120 for the lap size) and the same amount of 2 1/2" squares from
your
accent
color. In the green quilt they are reds, in the brown lap quilt
they are antique pinks, but the totally
scrappy quilt
uses
everything
in dark values.
These two lap size
quilts were donated to the local breast cancer center.
This 'brights' version uses an all black tone on tone print for the
'background' in place of the scrappy lights above. If using one
background fabric, plan on about 23 2 1/2" strips cut across the
width of the fabric, selvege to selvege. Depending on the length of
your colored strips, (and the amount of waste you may have from the
ends of odd lengths of scrap strips) you will need approximately
13 to 15 strips to cut the main block 'star quarters' . The other 8
strips are to cut the 120 2 1/2" squares you need for the block
corners. This is an average due to the differences in fabric width, the
amount you might get per strip might vary.
Set the squares aside
for
later,
and start with your strips!
All seams are 1/4" unless
stated
otherwise.
Place
the light strips
on top
of
the dark strips with right sides together, and stitch along one side
with
a 1/4" seam.
If
your dark strip is
longer
than
your light, strip just add another light on when you reach the
end....you
want as many combinations as you can come up with of darks and lights!
When you get a good long trail of lights sewn to darks, take them to
the
ironing board and press, presing the seam allowance towards the
darks.
Now the cutting begins!

Cut
the light/dark
strips into
4
1/2" squares. You will need 4 of these for each block. If you are
making
the big quilt above, you will need 396 of these or for the lap size,
120!! Just do them in
batches.....it
goes fast!

Next!
lay the
strip-square on
top
of your machine bed as shown watching the placement of the lights and
darks.
Place an accent square on top of the light rectangle with right sides
together. Have
you done these kind of "dog earred" triangles before? Set your presser
foot
at the upper corner of the square, and sew across the square on the
diagonal
through both layers. If it helps you, you can draw a diagonal line on
the
square from corner to corner first, but I prefer to just "aim and
shoot!"
The extra will be trimmed later! Just keep stuffing these through your
machine til you have the little squares sewn to the big squares in this
way....
When
you are done...trim
the
excess
about 1/4" from the stitching, and press. If you are really
ambitious,
or crazy like me, you can stitch again about 3/8" to 1/2" away
from
the first seam and when you trim, you will have a whole nuther batch of
eensy-teensy triangles already sewn in to squares for another
project!
Is THIS why they
started
calling
me The Masochist at the retreat? *LOL*

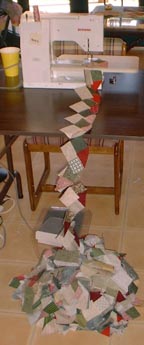
This
is the pile of 396
1/2
square
triangle units that I salvaged from my "dog ears" by double stitching
them!
NUTS, huh? I am thinking of putting them together in an ocean
waves
quilt...I will update on that later if it ever gets past the UFO
stage..*heehee*
These little units will be squared up at 2"....fun!
But
first, back to the
Star
Struck
Quilt! After trimming...repeat the process with the opposite diagonal
corner
by placing a LIGHT 2 1/2" suare on top of the dark strip in the strip
square....

You
can trim these,
press
them,
and toss the excess, or do like I did, double stitch about 3/8" away
from
the first seam line and end up with another pile of already sewn 1/2
quare
triangles....ready to square up to 2" and use in another project.(I
won't
tell if you toss them tho!) This is what my pile looked like at the
back
of my sewing machine as I was stitching all of these!
By this point you
should
have
all
your block quarters finished.
Now we are getting
somewhere!!
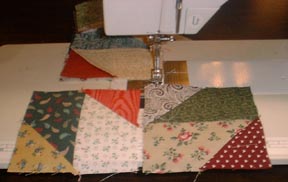
Time
to sew the block quarters into block halves! Like this:
Our
minds will always
see the
"dark"
stars first when we look at the quilt, but we make the block with LIGHT
stars first, then the dark ones appear when the blocks are set
together.
Stitch all your block halves....and press.
Then...pair
up and
stitch the
block
halves into complete light star blocks like this! The only rule I used
was trying to not put two of the same lights or darks next to each
other.
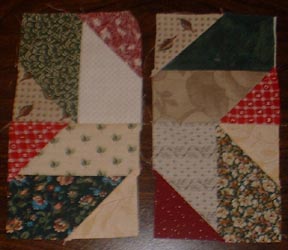
Finished blocks look
like this!
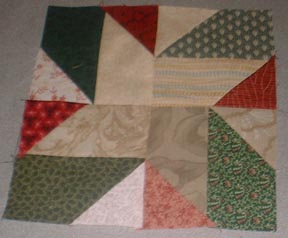
Set
the blocks together
and
you
are ready for borders! Because I was using scraps and other odd sized
pieces
that I was wanting to clear out of my fabric stash, I also made my
borders
out of random fabrics to carry out the scrap theme to the outside of
the
quilt. I joined lengths of 2" strips together on the diagonal for the
inner
border....and for the outter border I did the same with 5" strips. The
binding is going to be the same as the inner red border....
This
quilt wa a gift for my
baby
sister, Mary Sherwood who graduated highschool in May, 2001. Mary and I
are "bookends" as far as the family goes. I was the first child of 8,
and
she is the last of 8.
Questions
or Comments? I would love to hear from you!! Bonnie@Quiltville.com
© Quiltville Custom Quilting.All Rights Reserved.
No part may be used, copied or otherwise
altered without express written permission from the webmaster.