http://quiltville.com
Scrappy
Sister's
Choice Blocks!
or
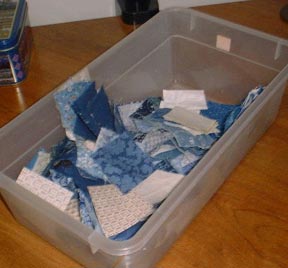
what to do with an over flowing bin of 2
1/2"
scrap strips!

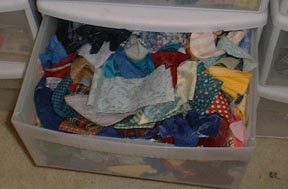
Maybe
you are in the same situation I am. I confess to being a fairly
organized quilter, who trims leftovers down into useable sizes for
scrap projects. If anything can be used, I hate to throw it out!
However, after cutting down the remainders of quilt backings, left over
border pieces, odds and ends left from Fat Quarters or other yardage,
and throwing in leftover binding strips...I am overflowing! I have bins
of different sizes of 1 1/2", 2", 2 1/2", 3", and 3 1/2". By FAR the
most overflowing is the 2 1/2" bin!
So here we go! I'm going to make something fun out of this mess. I
decided on the Sister's Choice block as a good candidate for this
project because of the appealing 9 patch center, and the fact that I
could cut EVERY piece from the same width of strips.
Instructions are for a 10" block.

I
planned on doing all different 2 tone 9 patches in the block
centers...but since I was using stuff ONLY from the scrap bin, I
decided to pull out all the neutrals I had in there, from white to tan
to use as the background pieces. I cut these up into piles of 2 1/2"X 6
1/2" rectangles, and cutting the rest into 2 1/2" squares. the one
unifying thing I am doing with the blocks is to use all GREEN as the
star points. So I pulled out the greens and cut them all up into 2 1/2"
squares. The only rule I used is I am planning on having all 8 star
points in the block match, so there needed to be at least a long enough
green strip to cut 8 squares.
Then I went fishing for the 9 patch fabrics! You could do this one at a
time, or do as I did, spend an evening playing match up!
Now, if you are like me....you love quick strip piecing techniques and
hate template patterns where everything is a separate piece! There has
to be an easier way, but strip pieced methods for 9 patches usually
involve 2 separate strip sets and make several blocks of one kind. What
to do when piecing one 9 patch block for the block center? Simple. I
made this easy for me!
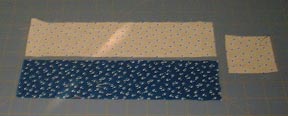
For
the 9 patch pieces I laid right sides together the two fabrics I
wanted for the 9 patch center. Cut these strips 2 1/2" X 11" long.
Then, depending on which fabric is your corner fabric for the 9 patch,
cut one extra 2 1/2" square from that fabric.
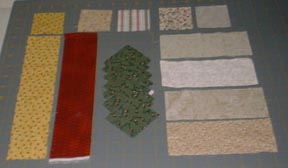
This is what you need to complete one block:
(2) 2 1/2"X 11" strips for 9 patch center + (1) 2 1/2" square for the
final corner.
(in this case it's the yellow square at the top left)
(4) 2 1/2" neutral squares for block corners
(4) 2 1/2" X 6 1/2" neutral rectangles for block sides
(8) 2 1/2" Squares of green for the star points.
Now
before I go any farther, I want to tell you about another
little trick I'm implementing....I learned a long time ago to use a
scrap piece of fabric to sew on and off of so I dont have thread tails
everywhere, and it keeps the pieces from being sucked down into the
needle hole. But now, instead of using just a scrap and sewing on and
off of it again and again until it is full of thread, I cut a bunch of
2" squares in different neutrals and blues...and am using THESE as the
leader pieces, sewing them into pairs, and then into 4 patches as I
go...so as a bonus, I have a continually growing pile of little 3 1/2"
4 patch blocks! :c)
But
I digress! Back to the Sister's Choice Block!
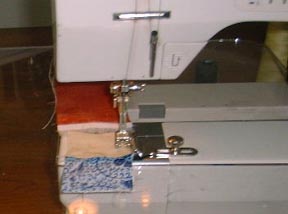
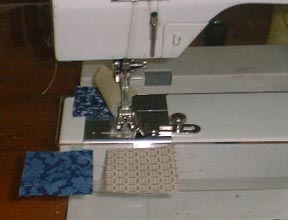
The first thing you are going to do is stitch your 11" X 2 1/2"
rectangles with right sides together, using a scant 1/4" seam
allowance and then stitch another pair of leader squares through the
machine (if you are doing this along with me) and snip the long strip
apart from the leader squares, just behind the presser foot. I keep a
little pair of spring snips right there on the machine bed just for
this purpose.
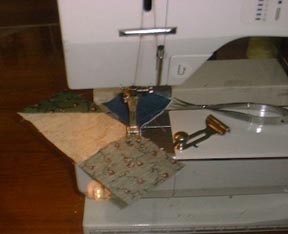
The little thing you see screwed up next to my presser foot is a seam
guide. I love how it keeps my seams accurate when strip piecing.
Press
your strip set with seam allowance going towards the darker
fabric. If you started your sewing with a pair of leader squares, press
this open to the dark too, and set it aside to match with another pair
to be made into a 4 patch.
Another
tip...when a cutting mat is no longer useable, I cut a corner
out of it to use near my machine so I dont have to get up and down so
much :c) fold the strip set in half, trim up the ends, and cut two
sections each 2 1/2" wide. This will give you 4 pairs of squares.
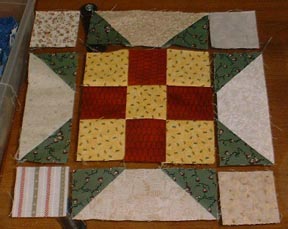
Lay out your 9 patch center as shown above...using the spare 2 1/2"
square to fill in the bottom corner. Assemble by rows into a completed
9 patch. Set it aside.
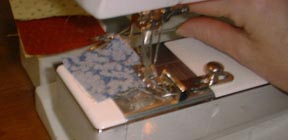
Star points! This involves a method I call 'flippy corners'....
(see
my leader squares still leading off and ending each sequence of
stitching as I go?)
Place
one green 2 1/2" square on top of one of the 2 1/2"X 6 1/2"
rectangles as shown with right sides together. You can either draw a
line from corner to corner on the green square as a guide line, or if
you have been sewing as long as I have, you can 'aim and shoot'! Stitch
from corner to corner diagonally being sure you come out right at the
point. Without cutting threads, stuff the next rectangle and square
through the machine, chain piecing all 4 of them in the same manner.
End the sequence by sending another pair of leader squares through the
machine, snipping off the rectangles just behind the leader squares.
Now trim the excess approx 1/4" from the seam line. Press towards the
dark triangles.
Now for the other end! This is where it is important to watch which
angle you are sewing....we want these points to 'V' from each other. If
you sew the second triangle on the diagonal the wrong direction, you'll
have a paralellogram for a background instead of a trapezoid. Aren't
you glad you learned geometry terms! Sew all 4 remaining star points
this way. Trim and press as above. Now we are getting somewhere and it
is starting to look like a real block!
Lay
your block with the 9 patch in the center, the rectangles on each
side, filling in your corners with the 2 1/2" squares..assemble into
rows, stitching the rows together to complete one block. YEAH!! You did
it! (is your pile of 4 patches also growing? :c)
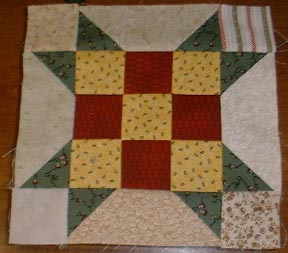
This
is my pile of 4 patches just since starting this project!
I've
so far made 20 sister's choice blocks. It isn't making a huge dent
in the scrap strip bin, but I am really liking how the blocks look when
laid out together. The multi-fabric background just gives it so much
more depth and interest than just using one fabric. Give it a try!
I'm going to keep working on these. Not sure when they will be
completed into a quilt, but I will post a pic when finished!
April 19th, 2004
The pile of blocks is now a TOP!
I set 72 blocks 8 X 9:
Not
sure when I will quilt it, but I really like how it turned out.
And it
felt great to really make a dent in that bin of 2 1/2" scrap
strips!
Here is a close up of the border fabrics I used:
I chose green for the outter border because all of the star points are
a different green, and it just seemed to pull it all together.
Next
project? To do something with all those blue/neutral 4 patches I
made using the 2" squares as starters and enders! I've got over 200 4
patches now, just by using those to start and end lines of stitching
while making this Sister's Choice Top! YEEHHHAWW! Sew Many Quilts
Sew Little Time!
Questions
or Comments? I would love to hear from you!! Bonnie@Quiltville.com
© Quiltville Custom Quilting.All Rights Reserved.
No part may be used, copied or otherwise
altered without express written permission from the webmaster