http://www.quiltville.com
Simply Strippy!
~Charity
Quilt Workshop~
Simple Quilt, Simple Directions!

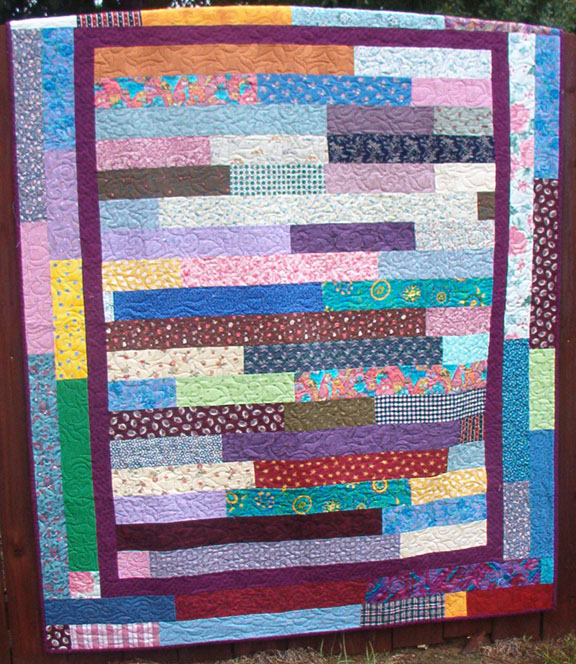
approx 58X70
Simply Strippy in Rainbow Colors
Simple Quilt, Simple Directions!
approx 58X70
Simply Strippy in Rainbow Colors
I had a bin of 3.5"
scrap strips. What to do with a bin of 3.5" scrap
strips? Between antique utility quilts that I have seen and
pictures in amish books of similar antique strip quilts all in
solids, I
figured I could do this too....who
needs a pattern, right? :cD
This quilt can be made in several color schemes. Think of Blues/Yellows, Brights, Batiks, Black/White, Pastels, Florals, Patriotic, Plaids…any combination you can think of as well as "Scrappy Everything!"
This quilt can be made in several color schemes. Think of Blues/Yellows, Brights, Batiks, Black/White, Pastels, Florals, Patriotic, Plaids…any combination you can think of as well as "Scrappy Everything!"
You will need:
Approx 2 yards of
scrap fabrics cut into 3.5" strips.
Inner border: approx ½ yard fabric of your choice (tone on tone works well)
Strips can be cut from FQ’s or yardage, or odd lengths of pieces.
Other items:
Sewing machine, extension cord, accessories
pins, thread, scissors, rotory cutter, ruler & mat.
Ironing station
 Continuously chain-piece random lengths of 3.5" strips end
to end in one
mile-long chain! You are going to want short strips, long strips, all
variety of lengths. I didn't use any strips longer than 22"...if they
are too long cut them in half! When you have a mile or so of them sewn
together (don't worry, you can sew more if your mile is too short!)
clip between the chain threads and iron the seams towards one side..it
doesn't matter which.
Continuously chain-piece random lengths of 3.5" strips end
to end in one
mile-long chain! You are going to want short strips, long strips, all
variety of lengths. I didn't use any strips longer than 22"...if they
are too long cut them in half! When you have a mile or so of them sewn
together (don't worry, you can sew more if your mile is too short!)
clip between the chain threads and iron the seams towards one side..it
doesn't matter which.
Cut (18) 44" long pieces from your mile-long chain. Lay these out on
the floor (or table) in a manner that pleases you and stitch lengths
together to form quilt center. I sewed the strips into pairs, and then
the pairs into fours, etc. Press seams in one direction (again, doesn't
matter which.)
At this point you might find that
you have uneven edges. That's okay!
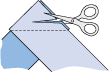
After pressing take the quilt center to your cutting mat, fold it
carefully, and trim up the sides!
Cut (6) 2.5" strips
cut selvege to selvege for inner border. Piece
the width-of-fabric border strips together end to end on the
diagonal so it is long
enough to go around the quilt.
 If I am wanting no joining seams
in the length of my borders, I cut the four borders along
the length of the fabric, longer than the quilt top so there is a bit
extra length. You don't want to run short
here.
Measure the strips the length of the quilt center from top to bottom
following directions below.
Press seam out towards the border.
If I am wanting no joining seams
in the length of my borders, I cut the four borders along
the length of the fabric, longer than the quilt top so there is a bit
extra length. You don't want to run short
here.
Measure the strips the length of the quilt center from top to bottom
following directions below.
Press seam out towards the border.
The
outer border uses more strips of your mile-long length of pieced
strips. After the inner border is added, measure through the center of
the quilt from top to bottom and cut 4 strips this length. Stitch these
pieced strips into pairs, and attach one pair to each side of the
quilt.
Press towards inner border. (less seams to fold over back on themselves
this
way.) Now measure across the quilt from side to side and cut 4 more
strips this
measurement. Sew them into pairs and attach to the top and bottom of
the quilt.
Quilt or tie
as desired and bind!


Lay out the quilt center on the floor,
smoothing as you go so it is straight and flat, but do not stretch...just
let it lay flat. Now take your
border strip and lay it down the CENTER of the quilt, top to bottom, just smoothing it out. DO NOT STRETCH,
just smooth, smooth. Trim it off at the bottom of the end of the quilt. I lay
my quilt out on carpet, so I also like to anchor the beginning end of
the borders with a couple of long pins stuck into the carpet. It keeps
that one border end from creeping as I smooth. Cut the second strip the
same way.

Sew your borders to the long
sides of the quilt first, pinning
the centers and the ends and
easing where neccessary. If the border seems bigger than the quilt top, stitch the border to the
quilt with the border against the
feed dogs. If the quilt center seems a bit
bigger than the border, then sew with the quilt center next to the feed dogs to
ease it
in a bit.
Now for
your top and bottom borders! Back to the floor...lay the quilt out... smoothing
smoothing....and lay the border
strips across the center of the quilt (including the borders you just
added) from side to side. Trim evenly. Pin centers and ends and ease where
neccessary as for side borders.
Some people take several measurements across the quilt and average that measurement for borders. (hear me gasping in fright here!) I *NEVER* "average" when measuring for borders because they can still flare, and where they are going to flare the worst is at the center of the quilt sides...That's why the CENTER measurement is the one to go for. If the 'averaged' measurement is longer than the quilt CENTER measurement, you are GOING to have a flared border. If the 'averaged' measurement is smaller than quilt center measurement, you are going to have borders that are too tight for your quilt center, and the center of your quilt is going to balloon out. Just use the center measurement and your quilt will lie flat!
Inner border: approx ½ yard fabric of your choice (tone on tone works well)
Strips can be cut from FQ’s or yardage, or odd lengths of pieces.
Other items:
Sewing machine, extension cord, accessories
pins, thread, scissors, rotory cutter, ruler & mat.
Ironing station
Continuously chain-piece random lengths of 3.5" strips end
to end in one
mile-long chain! You are going to want short strips, long strips, all
variety of lengths. I didn't use any strips longer than 22"...if they
are too long cut them in half! When you have a mile or so of them sewn
together (don't worry, you can sew more if your mile is too short!)
clip between the chain threads and iron the seams towards one side..it
doesn't matter which.
Cut (18) 44" long pieces from your mile-long chain. Lay these out on
the floor (or table) in a manner that pleases you and stitch lengths
together to form quilt center. I sewed the strips into pairs, and then
the pairs into fours, etc. Press seams in one direction (again, doesn't
matter which.)At this point you might find that
you have uneven edges. That's okay!
After pressing take the quilt center to your cutting mat, fold it
carefully, and trim up the sides! Cut (6) 2.5" strips
cut selvege to selvege for inner border. Piece
the width-of-fabric border strips together end to end on the
diagonal so it is long
enough to go around the quilt. The
outer border uses more strips of your mile-long length of pieced
strips. After the inner border is added, measure through the center of
the quilt from top to bottom and cut 4 strips this length. Stitch these
pieced strips into pairs, and attach one pair to each side of the
quilt.
Press towards inner border. (less seams to fold over back on themselves
this
way.) Now measure across the quilt from side to side and cut 4 more
strips this
measurement. Sew them into pairs and attach to the top and bottom of
the quilt. Quilt or tie
as desired and bind!Simply
Strippy in Blues
approx 58X70
Bonnie's
Border Hints:
Lay out the quilt center on the floor,
smoothing as you go so it is straight and flat, but do not stretch...just
let it lay flat. Now take your
border strip and lay it down the CENTER of the quilt, top to bottom, just smoothing it out. DO NOT STRETCH,
just smooth, smooth. Trim it off at the bottom of the end of the quilt. I lay
my quilt out on carpet, so I also like to anchor the beginning end of
the borders with a couple of long pins stuck into the carpet. It keeps
that one border end from creeping as I smooth. Cut the second strip the
same way.It is
really important
to cut your
border strips straight across, or you can compound the problem if that
angle is off from 45 degrees. If the angle is too wide, your next
border will flare up at the corners. If it is too narrow, it is going
to pull the top/bottom border down and your side border will be too
short. Keep those angles square when you trim!
This has ALWAYS worked for me, because when you are dealing with measuring tapes, they don't drape and lay the way your fabric does....your border fabric is your 'measuring tape' and as you smooth it across the center of the quilt top it will lay the same way as the quilt center with no tension on it.
This has ALWAYS worked for me, because when you are dealing with measuring tapes, they don't drape and lay the way your fabric does....your border fabric is your 'measuring tape' and as you smooth it across the center of the quilt top it will lay the same way as the quilt center with no tension on it.
Sew your borders to the long
sides of the quilt first, pinning
the centers and the ends and
easing where neccessary. If the border seems bigger than the quilt top, stitch the border to the
quilt with the border against the
feed dogs. If the quilt center seems a bit
bigger than the border, then sew with the quilt center next to the feed dogs to
ease it
in a bit. Now for
your top and bottom borders! Back to the floor...lay the quilt out... smoothing
smoothing....and lay the border
strips across the center of the quilt (including the borders you just
added) from side to side. Trim evenly. Pin centers and ends and ease where
neccessary as for side borders.
Some people take several measurements across the quilt and average that measurement for borders. (hear me gasping in fright here!) I *NEVER* "average" when measuring for borders because they can still flare, and where they are going to flare the worst is at the center of the quilt sides...That's why the CENTER measurement is the one to go for. If the 'averaged' measurement is longer than the quilt CENTER measurement, you are GOING to have a flared border. If the 'averaged' measurement is smaller than quilt center measurement, you are going to have borders that are too tight for your quilt center, and the center of your quilt is going to balloon out. Just use the center measurement and your quilt will lie flat!
Other Strippies!


Anne B. From Gloucester, England sent these pics of her strippy quilts!
Anne said she used "loads of lilac and purple strips in the vertical strippy, appliqued her favourite dolphins in the bottom corner and then overall quilted it in a wave pattern on my bernina." The second quilt was made for her baby niece. Great quilts Anne!
Strippies can even have strips of a planned set of fabrics across the quilt for a more planned look!

And they can use any width strips you want!

These two strippies were made by Margaret Hunt
for the Hurrican Katrina Relief Effort.
Be sure to check out Margaret's Website!

Official Quilt Inspector!
(So far kitty thinks they are purrrrrrrfect!)
Pics
of quilts I've collected for
inspiration, many antiques! Sewing strippy is NOT a new concept! :c)

This is one in my collection. Made circa 1920's it has lots of shirting and conversation prints.

Antique Strippy with Orange sashings

Antique Strippy, spirals around center square!

This one goes round and round too! Circa 1940.

wide and narrow bars!

Wooly Strippy Bars!

Whacky strippy bars and 4 patches
I'll post more as I come across them. I've always been drawn to utility quilts! to me these are REAL quilts with real purpose and use for every day living!
 Questions
or Comments? I would love to hear from you!! Bonnie@Quiltville.com
Questions
or Comments? I would love to hear from you!! Bonnie@Quiltville.com© Quiltville Custom Quilting.All Rights Reserved. No part may be used, copied or otherwise
altered without express written permission from the webmaster.