


Powered by


Quiltville
Custom Quilting
http://www.quiltville.com
Crab Apple Tree Base Tutorial
(Click here for printer friendly version)
http://www.quiltville.com
Crab Apple Tree Base Tutorial
(Click here for printer friendly version)

Welome to the Tree Base
Tutorial! If you have ended up here, you must have followed a
writen link in my book "Adventures
With Leaders & Enders!" While writing the book, my editor
and I decided that we would rather include more patterns in the book,
instead of "waste space" putting in basic tutorials, her thought being
that anyone purchasing the book would likely have a basic knowledge of
quilting before they bought it. Paper piecing instructions can take
many pages if you are giving them step by step with illustrations, so
to save space and leave more room for other patterns I came up with the
idea to put this basic paper piecing tutorial here on my website.
If this is your first visit, I hope you will also take some time to click the links to the left and wander your way through Quiltville! There are many free patterns as well as other hints, helps and techniques on my favorite subject - - - Scrappy Quilting!
So, here we go!
If this is your first visit, I hope you will also take some time to click the links to the left and wander your way through Quiltville! There are many free patterns as well as other hints, helps and techniques on my favorite subject - - - Scrappy Quilting!
So, here we go!
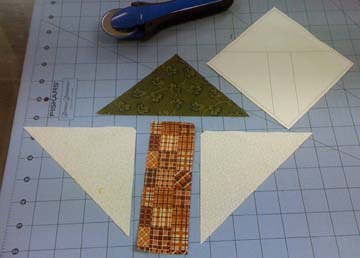
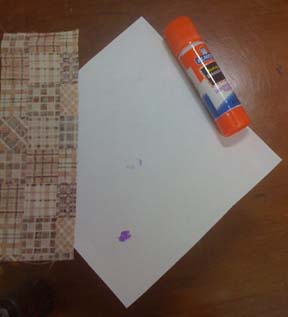
Along with your paper peicing
pattern that can be copied from the book, you will need two large
background triangles, one green tree base triangle, and a trunk! I tend
to cut my paper piecing parts fairly large, and they will be trimmed
down as we go. I've had them fall short enough times while trying to
"save fabric" that I finally decided that this was where I was going to
leave myself more wiggle room!
For Trunk: From a 2" wide strip of brown, cut a tree trunk approximately 5.5" long.
For Tree Top: Cut a 5" square of green on the diagonal from corner to
corner, yeilding 2 tree bases.
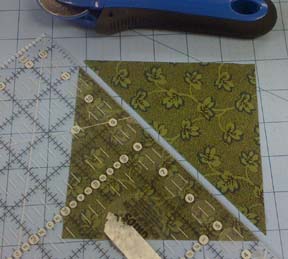
For the background things are a bit different. The straight of grain needs to go on the long edge of the triangle, so this is where I pull out my trusty Companion Angle Ruler.
The brown dots are sand paper dots I've placed to help keep the ruler from slipping.
For Trunk: From a 2" wide strip of brown, cut a tree trunk approximately 5.5" long.
For the background things are a bit different. The straight of grain needs to go on the long edge of the triangle, so this is where I pull out my trusty Companion Angle Ruler.
The brown dots are sand paper dots I've placed to help keep the ruler from slipping.
I like to cut through at least two
layers at a time, so this 3.5" strip is doubled over with right sides
together. Place the 3.5" line along the bottom of the background strips
and trim as shown. Each tree base requres two of these triangles.
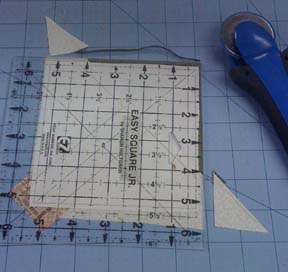
If you don't have a Companion Angle Ruler, you can cut one 6.5" square, and cut it from corner to corner twice with an X to yeild 4 background triangles. Remember they are big to allow for trimming. The tree base will FINISH at 5" when it is sewn into the block/quilt.
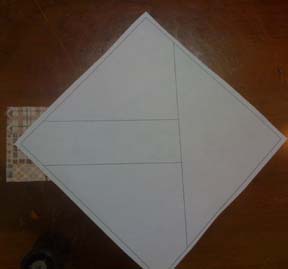
If you don't have a Companion Angle Ruler, you can cut one 6.5" square, and cut it from corner to corner twice with an X to yeild 4 background triangles. Remember they are big to allow for trimming. The tree base will FINISH at 5" when it is sewn into the block/quilt.
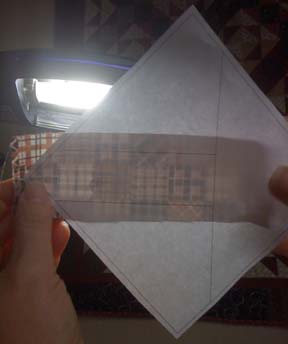
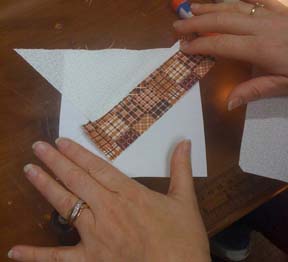
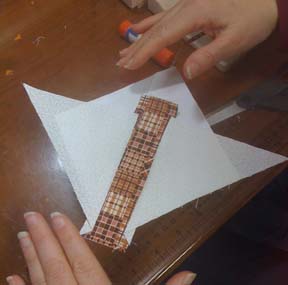
I like to use a glue stick to
position my first piece. Some people pin, but I find the pin buckles
the fabric and the paper, and just a couple dots of a glue stick (shown
in purple) are enough to keep the first piece, the trunk, from shifting.
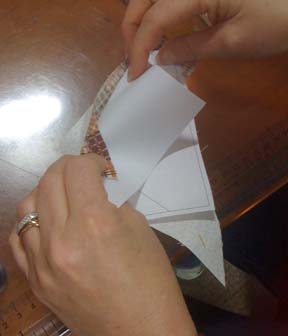
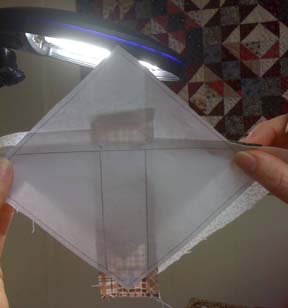
When we are paper piecing we are working with the lines on the paper toward us, and the fabric with it's wrong side against the back of the paper. It's like working upside down, and can take a bit to wrap your mind around, but stick with me. See how you can see the fabric through the paper when holding it up to the light? This is how I check for proper placement. Put some glue dots on the unlined side of the paper, where the trunk will be positioned. Lay the trunk wrong side up on a flat surface, and then lay the paper pattern on top of it, being sure that you have at LEAST 1/4" beyond the lines, and beyond the block corner. Give it a good finger press to be sure glue holds you there. Hold your block up to the light as shown in the 3rd pic to be sure you are not falling short where the lines are.

When we are paper piecing we are working with the lines on the paper toward us, and the fabric with it's wrong side against the back of the paper. It's like working upside down, and can take a bit to wrap your mind around, but stick with me. See how you can see the fabric through the paper when holding it up to the light? This is how I check for proper placement. Put some glue dots on the unlined side of the paper, where the trunk will be positioned. Lay the trunk wrong side up on a flat surface, and then lay the paper pattern on top of it, being sure that you have at LEAST 1/4" beyond the lines, and beyond the block corner. Give it a good finger press to be sure glue holds you there. Hold your block up to the light as shown in the 3rd pic to be sure you are not falling short where the lines are.
Now, take a background
triangle, find the way it is supposed to lay AFTER you sew it...and
carefully flip it right sides together with the tree trunk. You can
check placement by holding it up to the light again.
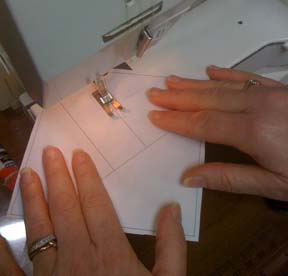
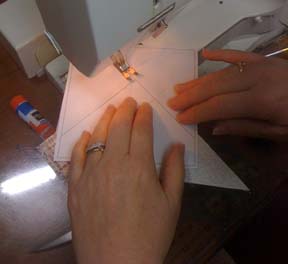
Before we sew, I want to give you a couple hints. When paper piecing, I like to use a denim sized needle. (a 14 is good.) I also set my stitch length very small, about a 1.5 on my Bernina. The larger needle makes bigger holes. Putting those holes very close together means the paper will be easy to remove. Most people who I've taught who have had trouble find that it is because their stitches are too long and the holes too far apart. Give it a try!
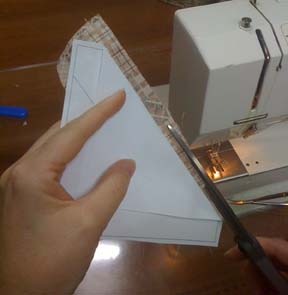
The second picture above shows me stitching ON THE LINE with the fabric pieces underneath. Start your stitching 1/4" before the block outline so the stitching will go all the way to the edge of the trimmed block. When this seam is sewn, fold the paper back, and trim the seam to 1/4" after making sure that your background triangle extends beyond the edge of the block when pressed. I use my scissors a lot to trim. I find it is faster to trim with scissors like this, than to take time to lay it flat on a cutting mat, align the ruler, grab the rotary cutter, etc. An eyeballed 1/4" is fine, it is the seam that is important here, not the allowance.
Before we sew, I want to give you a couple hints. When paper piecing, I like to use a denim sized needle. (a 14 is good.) I also set my stitch length very small, about a 1.5 on my Bernina. The larger needle makes bigger holes. Putting those holes very close together means the paper will be easy to remove. Most people who I've taught who have had trouble find that it is because their stitches are too long and the holes too far apart. Give it a try!
The second picture above shows me stitching ON THE LINE with the fabric pieces underneath. Start your stitching 1/4" before the block outline so the stitching will go all the way to the edge of the trimmed block. When this seam is sewn, fold the paper back, and trim the seam to 1/4" after making sure that your background triangle extends beyond the edge of the block when pressed. I use my scissors a lot to trim. I find it is faster to trim with scissors like this, than to take time to lay it flat on a cutting mat, align the ruler, grab the rotary cutter, etc. An eyeballed 1/4" is fine, it is the seam that is important here, not the allowance.
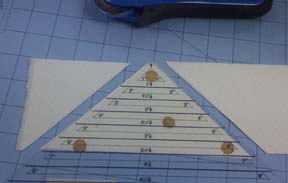
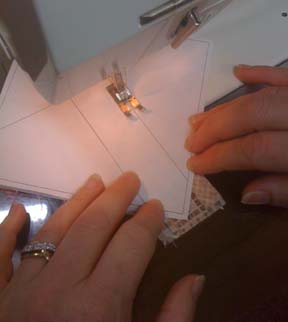
The
first picture shows the first background triangle pressed out. The
second picture shows me lining up the second background triangle
before stitching. I watch the line on the paper, and try to eyeball it
1/4" down from the edge of the background triangle that is laying in
position on the machine bed. Make sure you don't fall short, but you
don't want to fall too long either!
The third picture is sewing right on the line, with the pieces in position. You can't see it, but my stitching starts about 1/4" beyond the line for the tree base that goes across the top of the trunk, and extends 1/4" beyond the paper where the line ends.
The third picture is sewing right on the line, with the pieces in position. You can't see it, but my stitching starts about 1/4" beyond the line for the tree base that goes across the top of the trunk, and extends 1/4" beyond the paper where the line ends.
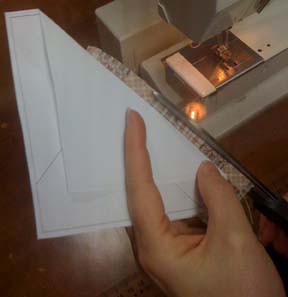
Fold
the paper out of the way, and use scissors to trim excess seam
allowance from the seam, just aiming for an approximate 1/4".
Press both background triangles out toward the edge of the block.
The third picture shows me holding the block up to the light to check
position of the block base triangle....I'll be sewing on the line on
the paper, but the triangle is right sides together with the trunk so
that when I flip it out, it will cover the remaining place on the paper
template.
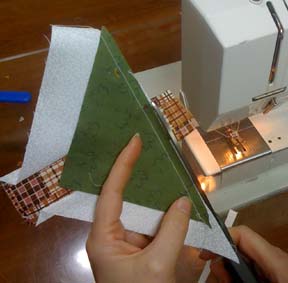
Sew
that last seam attaching the tree base to the trunk! Fold the paper out
of the way, and trim that last seam to an approximate 1/4". Press the
block well! I like to use a ruler that has a good 1/4" marking all the
way around the outside edge of the ruler. I place that 1/4" seam
line on the edge of the block line on the paper...and trim 1/4" beyond
the line, going up the right side first (I'm a righty) and across the
top, trimming off that excess. Then rotate the block and trim the
remaining two sides.
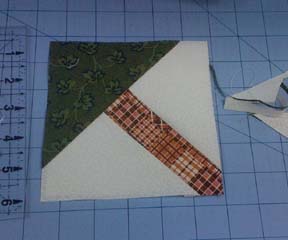
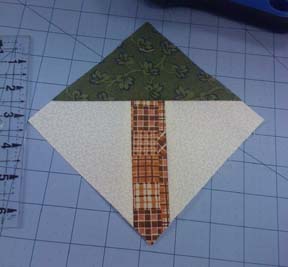
One
tree base down! At this point, it's up to you how many you will make!
Carefully remove the paper from the back of the block, and proceed to
add your checkerboard parts to the top of it to complete your own
Crabapple Orchard!
 Questions
or Comments? I would love to hear from you!!
Questions
or Comments? I would love to hear from you!! © Bonnie K Hunter & Quiltville.com 1997-2011 All Rights Reserved. No part may be used, copied, sold, distributed or otherwise
altered without express written permission from the author/webmaster.