


Powered by


Quiltville
Custom Quilting
http://www.quiltville.com


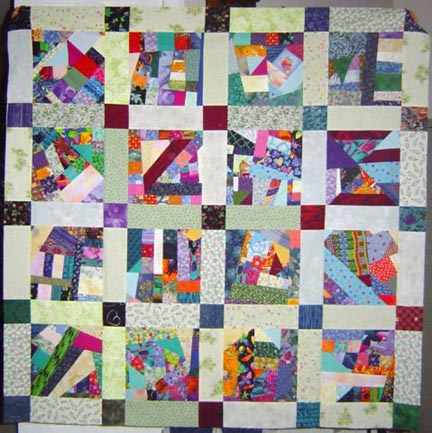
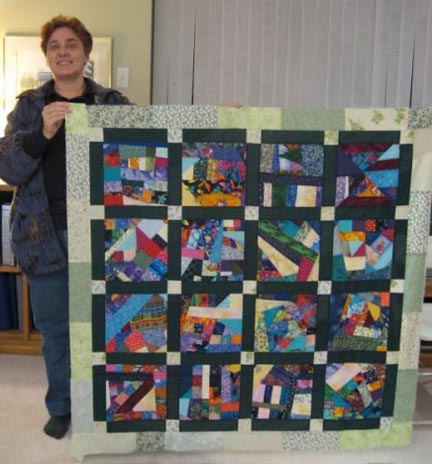
More of Barb's Quilts!
Thank you Barb, for sharing your crumb piecing methods!
Barb's Email
http://www.quiltville.com
Barb's Crumb Blocks!
(Click Here for Printer Friendly Version!)

(Click Here for Printer Friendly Version!)
I'd like to thank Barb Horte for
agreeing to send me her method of crumb-piecing! We all have
different ways and methods we prefer to work with and I thought her
directions would be of benefit to everyone who likes to make bigger
crumb blocks! She has great ideas! It is especially fun for me to work
in collaboration with other quilters. I learn so much, and i'm sure you
will too!
Notes
From Barb:
I make quilts! Patchwork quilt tops mostly because that’s the fun part. I seem to accumulate stacks of unquilted tops because I don’t know anyone else that actually needs a quilt.
I grew up on a farm in the middle of the province of British Columbia,Canada, the fourth of nine children. Mom sewed our clothes and did crafts. Grandma made quilts from old clothes. I sewed clothes from the time I was fourteen and have always loved working with fabric. Over the years I did a lot of other crafts: knitting, embroidery, huck weaving, macramé, crochet, but didn’t find the perfect one until I took a 12-week night school class and made my first sampler quilt with spaceship flannelette on the back.
My second quilt was made of sewing scraps, leftover from making kid's clothes. Most were cotton-poly, but my daughter loved the quilt and wore it down to almost nothing. I don't do the other crafts anymore, I make QUILTS!
Barb's Helpful Hints:

This
block can be made any size. Use small scraps to make 3" or
6" blocks, or wider strips to make 12" blocks. My favorite is to
cut the blocks 9½ inches, which makes a 9" finished block.
- Every seam you sew needs to be a straight line. If you aren’t sewing straight lines the block will not lie flat. By cutting a straight edge on every piece of fabric you sew, you can make these blocks without using a paper or fabric foundation.
- Start with enough scraps to make a quilt. I don’t like to be adding new colours at the end to make the pieces big enough or the newly added pieces will all be on the outside edges of the blocks and will be a noticeable addition. I like to start with one grocery bag of scraps and strips (loosely dropped into the bag, not packed in) for a twin size quilt. By starting with a large amount you ensure the colours will be evenly distributed throughout. By working with a large variety and using each piece in more than one block, the final quilt comes out looking as if you carefully coordinated it.
- Prepare your scraps. Press them all before starting. It’s important that every piece have a straight edge to use as the seam guide. Most of the pieces will have at least one straight edge. Unless they’re flat you won’t know which edge is actually straight. If you use a piece without a straight edge, you need to cut one edge straight when you use it. It has to lie flat to get a straight cut so it needs to be pressed. Take your selection of scraps and press them. While you’re at it, separate out the small pieces. Use them first, in the centres of your blocks. It’s much harder to use them later.
- Start a block. For each block, start by sewing two small pieces together. If one has a straight edge use it as the guide for this first seam. If not, cut a straight edge on one of the pieces of fabric.
- Press the seam. Every seam needs to be pressed before you sew over it or the finished block won’t lie flat.
- Build the block. Add the next piece of fabric, using its straight edge as your seam guide. Continue adding pieces or strips, building the block larger with each one you add. Add each strip so it crosses one of the previous seams. Press every seam before sewing across it. Remember you are building a square. Keep working toward making a square that is about the size you’ve chosen. Work out from the centre or up from a corner
More Helps!
- I work on six blocks at a time. This allows continuous piecing. Since every seam has to be pressed before you can sew across it, I prefer to get up and press six blocks rather than doing one at a time.
- If you have one piece of fabric that really stands out, use it in a number of blocks (not as one big piece in one block) or the quilt has one spot that draws the eye.
- Blocks with a diagonal line are more interesting then blocks with only horizontal and vertical lines
- Sew leftover squares of fabric together to make strips – remember to cut one edge straight
- If adding a strip with seams in it, press toward the piece with the fewest seams
- Use any of the following as the first piece of your block: crumbs, partial blocks, pieces of strip sets, half-square triangles.
- If the piece on top is straight, the one under it doesn’t have to be
- After each strip is added, I trim the seam allowance to ¼ inch to keep bulk to a minimum. (if required)
- When trimming, keep those triangles and bits you’re cutting off. You’ll be surprised how often you want just that size to fill in a corner.
- Lay the block on the ruler to determine when to stop building it. Make it a little bigger than the desired finished size. Add small pieces to corners if required. Let the blocks stack up until you have enough to make your quilt.
- Now, press them all with steam.
- Trim around the ruler of your choice (6½ - 9½ - 12½ or whatever)
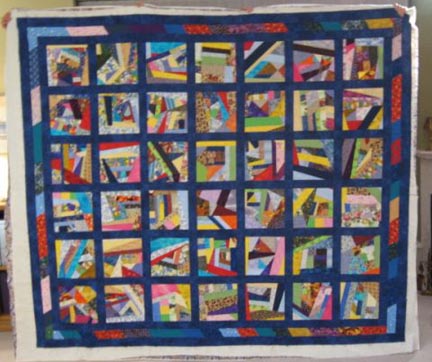
- Use sashing or alternate blocks to put the blocks together. Without the sashing or alternate blocks it’s hard to press the seams flat because of the number and thickness of seams at the edge of the blocks.
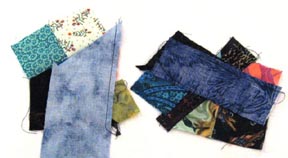
Building Two Blocks:
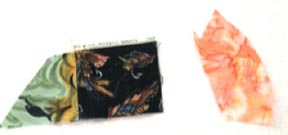
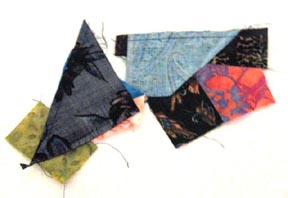
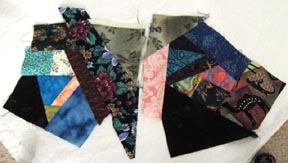
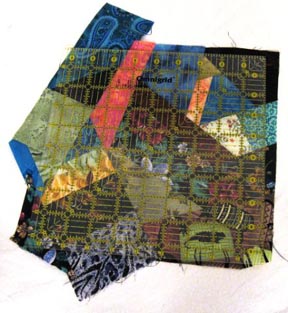
These are the starting crumbs for the two:
These are the starting crumbs for the two:
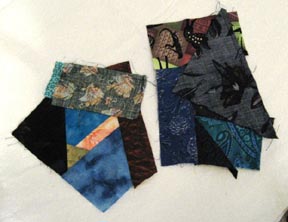
I’ve added a blue triangle
with a
straight edge to the curved edge of the orange piece.
On the right I added a straight piece to the straight edge of the
starting crumb.
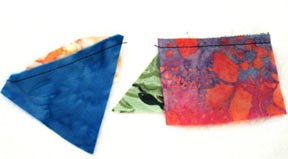
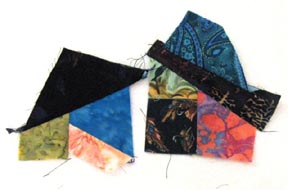
Press
after every seam. Before pressing the blue piece away from the
orange, I trimmed the
orange piece to reduce bulk.
Building the blocks,
straightening each block with the next piece I’m adding. On
the left a small piece with a straight edge. The piece is
wider than the edge I’m sewing it to, to make sure I have room to trim.
On the right I’m adding a strip following slanted line on the
block. After sewing the strip on I’ll trim away the pink above it.
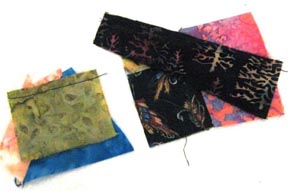
After trimming the pink out
from
under the new strip, I pressed both the new pieces away from their
blocks rather than try to force a seam to press under.
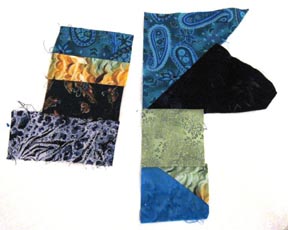
Another piece sewed to each block. The black triangle sewed to the left piece has a straight edge that I sewed against. After sewing the seam I trimmed the green corner away before pressing.
Another piece sewed to each block. The black triangle sewed to the left piece has a straight edge that I sewed against. After sewing the seam I trimmed the green corner away before pressing.
The
new crumbs are pressed away
from
the center of the block.
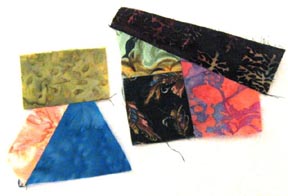
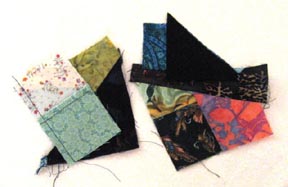
This time the unit I’m adding
on
the left is made up of two smaller squares. Before pressing, trim
away the black corner on the lower
left. On the right I’m adding a black triangle on the
slanted edge on the top
right of the piece.
Both of the strips I’m adding
here will straighten the edge I’m adding it to. After sewing,
trim the seam allowance to about ¼ inch.
I have
added green corners to
both blocks, using a rectangle that I cut in half on the diagonal.
Keep adding strips to increase the size of the blocks.
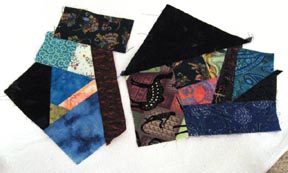
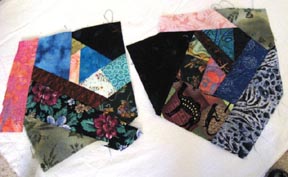
I’m
starting to think about the
final block now, deciding what two edges I’ll keep and which I’ll build
on. In this picture, the top right of both blocks is a corner
that I’ll keep as a corner of the block. I will build up the
other edges to get to the final size of 9½ inches.

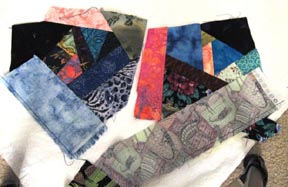
I’m
starting to have a lot of short ends from trimming strips now, so I
sewed them together to
make pieced strips. I sewed the pieces together and then used the
rotary cutter to make a straight edge on each of them.
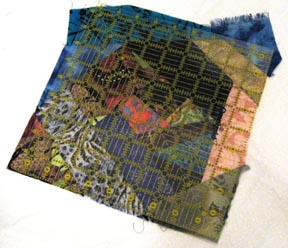
I’m finishing this block using strips to increase the size, keeping
that one green corner and building on the other edges.
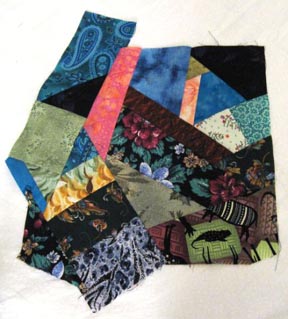
I’m
building this block using the pieced strips I made from leftovers.
On the lower left edge is one of the pieced strips I made, and on the
left edge is the other pieced strip I made. When I measured it with the
ruler, I found it a bit small on the lower
left edge so I added a triangle I’d trimmed off previously. Using
my 9½ inch square ruler, I can see that this piece is
almost big enough. The top left edge is needs a bit more.
This block is also slightly small on the upper left edge.
Those triangles you get from trimming seam allowances come in really
handy at the end to fill in corners.
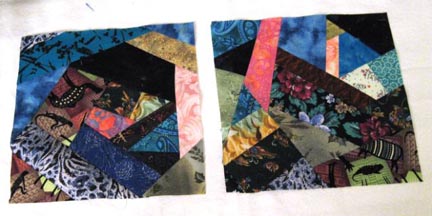
Both blocks are completed!
More of Barb's Quilts!
Thank you Barb, for sharing your crumb piecing methods!
Barb's Email
 Questions
or Comments? I would love to hear from you!!
Questions
or Comments? I would love to hear from you!! © Bonnie K Hunter & Quiltville.com 1997-2011 All Rights Reserved. No part may be used, copied, sold, distributed or otherwise
altered without express written permission from the author/webmaster.